Wednesday, June 17, 2009

Tutorial #22 Purple Passion

Purple Passion
©BamaVamp


For this tutorial you will need the following:
Vix mask #197, find it HERE
Eyecandy 4000 Gradient Glow(optional)
Brush of your choice (optional)
PTU Scrap Kit called Night Scene from Jo, you can find it HERE
Tube of your choice. I am using the arwork of Elias Chatzoudis, you must purchase a license from mypsptubes to use the same tube.

Find the elements from the scrap kit you wanna use, as well as your psp tube and open them up in PSP.
I have used BeautifulBow, MetalSkull, WingedBlingHeart, and WrapFrame2 from the kit.

Create a new canvas 500x500 white background. Add a new raster layer and floodfill with a color that corresponds to your tube.
I used #6e008e. Find the Vix mask and apply to your colored floodfill layer, then merge group.
Go to Adjust...Add Noise..Uniform at 35 percent with Monochrome checked.

The rest is basically copying and pasting. Copy n paste your frame to your new canvas, as well as your main tube,
and any elements you are using and place accordingly. I added a Sexy Ass Bitch brush as well.
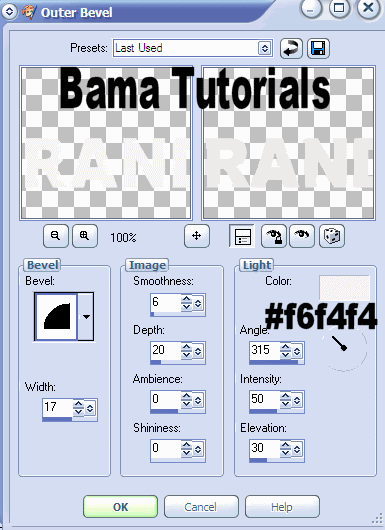
I added a gradient glow to everything but the frame with the settings of Glow Width 3.00 and under color set it
to the Fat Setting and apply.
I also added a small drop shadow to the same layers that I added the glow to. I used settings of 2 2 70 2.89 black.

Add your name. I used the same Glow and Drop Shadow as before.
Save your work!


This tutorial was written by BamaVamp on 6/17/09.
Do not copy nor translate this tutorial.
Contact me for usage information.
Any likeness to any other tutorial is purely coincidence.

Wednesday, June 10, 2009

Tutorial #21 Angels are like Diamonds

Angels are Like Diamonds
©BamaVamp


Supplies Needed:

~Mask 219 by WeeScotsLass
~Tube of your choice. I am using the licensed work of Jose A Cano. Please purchase his work at mypsptubes.com if you wish to use the same tube.
~Clouds by Rainbow Coffi(included)
~My Angel wording (included)
~PTU Scrap Kit by CBJ called Fairy Wingz and Blingz--I only used 2 parts from this kit, a paper and a diamond accent, so its not *required* for this tutorial, but I highly recommend it as it is a fantastic kit.
~EyeCandy4000 Gradient Glow(optional)

My Supplies are HERE.
---------------------------------------------------

Let's Get Started!

Open a new canvas, 600x600 in size, white background. Open your supplies in PSP as well.

I used one of the scrap papers from Jo's kit, but you can simply use a corresponding color for your background mask. If you use a paper, copy n paste the paper unto your working canvas as a new layer. Otherwise just add a new layer and floodfill with a color corresponding to your tube. Go to Layers..New Mask Layer..from Image and load the WSL mask. Right click on the Mask layer in your pallete and merge the mask group together.

If you are using the diamond accent from the kit, click on the Mask Layer go to Selections..Select All..Selections Float...Selections Defloat. Paste your diamonds as a new layer, then go to Selections..Invert and hit the delete key on your keyboard. This should get rid of all the excees diamonds around your mask layer. Go to Selections..Select None.

Now copy n paste your main tube as a new layer. Place her in the middle of your masked layer. Go to Effects..EyeCandy4000..Gradient Glow. Under Basic, change your Glow Width to 3.00 and under Color, chooe the Fat setting and Apply. I added a slight drop shadow of 2 2 50 5.00 using as darker color from my tube.

Copy n paste a cloud of choice to your canvas, resize as needed. I duplicated the cloud and placed them side by side at the bottom of the canvas.

Copy n paste the Angel wording as well. Feel free to colorize to match your tag, just don't share it or use it as supples in another tutorial.

Add your name. I used a font called CAC Champagne, using the dark color from my tube then adding the same Gradient Glow and drop shadow as we used on our tube.

Add your copyright/watermark information and save!


This tutorial was written by BamaVamp on 6/9/09.
Do not copy nor translate this tutorial.
Contact me for usage information.
Any likeness to any other tutorial is purely coincidence.

Tuesday, June 9, 2009

My first Award!

Photobucket

I was just shocked when I visited Patty's blog (Sunspotpp's Place) to find she had chosen me for an award! I am so very flattered!! Patty is a wonderful person I have been very lucky to know the past few years at TAG and has become someone I consider a great friend at her forum Wicked Angelz. TYTY Patty I am honored!!

As it goes I am suppose to give this to 4 folks, so I am gonna hand it off to some of my fellow creative team members at CBJ and of course our fearless leader.

Jo at CBJ
Meaculpa at Le Lezione
Debbie at Mystic Inc Design
Veronica at Veronica

Saturday, June 6, 2009

2 Tag Templates

These are my first shots at making tag templates and I thought I would post them up for sharing. Both of them are in PSP format. Previews are smaller than actual templates.

This one is used in my Mermadia Tutorial:

Download HERE.

I am working on a tutorial for this one:

Download HERE.
I would love to see what you do with these. You are welcome to use them in Tutorials, but please link to my site for downloading.


Monday, June 1, 2009

PSP Tutorial #20 Summer Nights

Those Summer Nights
© BamaVamp


Supplies Needed:

Template 52 from Melissaz Creations
Scrap Kit of your Choice. I am using a PTU kit called Beach Bum from Creations by Jo.
At least 2 tubes of your choice, one male and one female works best. I am using the licensed artwork of Elias Chatzoudis. You must have a license from mypsptubes.com to use his work.
Penta Jeans Plugin (optional)
Penta Dot & Cross Plugin (optional)
EyeCandy 4000 Gradient Glow..my glow setting found here. (optional)

Let's Begin!

Open the template, your tubes and scrap kit in PSP.
I started by deleting the copyright layer as well as the palm trees. If you do not have a palm tree in your scrap kit, you might wanna keep them.

I picked 3 papers from the scrap kit that I wanted to use. As well as the palm tree and turtle from the kit.

We are gonna start at the bottom and work our way up.

Scrap Kit Paper Steps..when using scrap kit papers in a template the actions are all the same. I will explain it in this first step and after that I will just say refer to the Scrap Paper Steps.

Highlight the Background Squares layer, go to Selections..Select All. Selections..Float. Selections..Defloat. Copy and paste the scrap paper that you wanna use as a new raster layer. Go to Selections...Invert and hit Delete on your keyboard. Go to Selections..Select None. Now delete the layer called background squares.

Click on the Narrow Rectangles Layer, follow the Scrap Paper Steps but add a different scrap paper.

Click on the Dotted Line layer. I did not use a paper here. I just went to Selections..Select All. Selections..Float. Selections..Defloat and used the paint brush to fill in the dots. Then deleted the original Dotted Line layer.

Click on the Rectangle layer and follow the Scrap Paper Steps.
While still on your new rectangle layer, go to Penta..Dot & Cross with the settings on 22, 10 and 2.

Click on the Rectangle Frame. I did not use a paper here either. Instead I just grabbed my floodfill tool and colored them. I also used this same step on the Square Frames layer as well.

Click on the Squares layer, I just floodfill this layer with a color of choice. Then went to Penta...Jeans with the settings of 79 and 4.

Highlight you Wordart layer. Use the Scrap Paper Steps, but instead of using a paper I added a new raster layer and floodfilled with a color of choice, then deleted the Wordart layer.
While still on the wordart layer, go to Eyecandy 4000..Gradient Glow. I used my doublewhiteglow setting. Then added a drop shadow of 2, 2, 41, 2.89 color #404040.

Use the same drop shadow for all your layers we just worked on, excpet for the dotted lines.

Now time to add the tubes of your choice, add the same drop shadow.

Add a new raster layer to the bottom of your canvas and floodfill with white.

I also used some doodles from the scrap kit to add a little accent to the background.

Add your text. I used a font called Riesling and added my gradient glow and the same drop shadow to my name.
Don't forget your copyright/watermark information as well.

Save and enjoy!

This tutorial was written by BamaVamp on 6/1/09.
Do not copy nor translate this tutorial.
Contact me for usage information.
Any likeness to any other tutorial is purely coincidence.

PSP Tutorial #19 Guilty

Guilty Tutorial
©BamaVamp


Supplies Needed:

Blackboard (thank you Debs)
My Measuring Tape
Arial Black Font
Fingerprint Proof Bag
Lokas 3d Shadow (optional)
A tube of your choice. I am using the licensed artwork of Keith Garvey. You can buy his work at mypsptubes.com

Supplies HERE

Start with a new image 600x600. Floodfill with white.
Add a new raster layer and using your brush tool with the color #c0c0c0, draw some grungy shapes just to give the mug shot a dirtier look.

Copy n paste the numbered measuring tape over to your new canvas. You can either use the tape with the numbers or I have provided a blank tape for you to add your own numbers, the choice is yours. Move this layer over to the left of your image.

Copy n paste the Fingerprint Proof bag over and move it to the top right of your new canvas.

Now copy n paste the tube you are using. Paste the blackboard on top of the tube and place it at the bottom of your canvas.
Give both the tube and the blackboard a drop shadow. I used Lokas with these settings:


Now its time to add your text. Use your font tool with your background on white, Arial Black and type your name in capital letters. While on your text layer, go to selections, selections from Vector layer, and convert your text to a raster layer.
Now we need to apply a slight outer bevel using the settings below:

<

Go to selections, select none.

Now its time for your own creativity. I added GUILTY and underneath it put the crime of Grand Theft Auto. I added the date and an ID number to my blackboard as well. Be sure to add your ID number to the fingerprint bag that we copied and pasted earlier.

Crop the tag to your desired size.

When ya get happy with it, you can add a small border by going to...Image, Add Borders..border color black, 2 pixels and symmetric checked.

Save and enjoy!

This tutorial was written by BamaVamp on 7/16/07.
Do not copy nor translate this tutorial.
Contact me for usage information.
Any likeness to any other tutorial is purely coincidence.