
Framed Corners
©BamaVamp
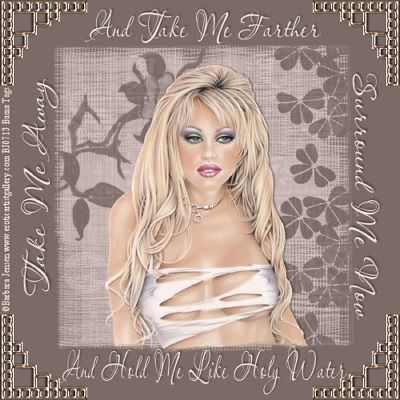
This is one of my first tutorials.
Supplies:
A tube of your choice. I am using the artwork of Barbara Jensen which cannot be used without a license.
A font of your choice
Corners enclosed in zip file
Mask enclosed in zip file (mask is the lovely work of MzKels)
~~~~~~~~~~~~~~~~~~~~~~~~~~~~~~~~~~~~~~~~~~~~~~~~
Open your mask, tube and the corners in PSP.
Open a new image 400X400.
Pick a dark color from your tube as the background color (I'm using #2f2f2f) and a light color from your tube as the foreground color (#829d9c). Flood fill with your foreground color.
Add a new raster layer and floodfill with your background color.
With your top layer active go to Layers...New Mask Layer From Image. Find the mask entitled 208MaskkelsWWA..Source Luminance Checked. Right click on that layer and merge group. Rename this layer Mask.
Copy your tube and paste as new layer.
Move your tube layer underneath the mask layer.
The mask will be covering up your tube, so highlight your mask layer, grab your eraser and erase the parts that are covering your tube. Merge Visible.
Go to Edit..Canvas Size and make it 500X500. Add a new raster layer and drag it underneath your merged layer.
Floodfill your raster with the darker color that you used.
Pick a corner that you wish to use. I picked the squares corner in the bottom middle of the corner tube sheet. Use your Freehand selection tool and trace around the corner you wish to use..go to edit copy..and paste on your working canvas. I colorized my corner to match my tag by going to Adjust..Hue and Saturation settings at hue 128, Saturation 25. I also resized my corners 80% bicubic.
Move the corner to the top left of your frame and place it as you want it to look. With the corner layer highlighted duplicate it...Image Mirror...Duplicate that layer and go to Image...Flip..Duplicate that layer and go to Image..Mirror.
You should have the corners in every corner of your tag and they will be all alined.
Now add some quotes or brushes or anything that you choose. I added lyrics from a song called Holy Water by Big & Rich. Using the light color from my tube.
Remember to add the copyright of the tube you are using..and your watermark if you choose.
Right click on any of your layers in your pallete, and Merge Layers..Flatten.
Go to Image..Resize..with settings of 80% bicubic, Resize All Layers checked. Save as .jpg.
~~~~~~~~~~~~~~~~~~
Hope you had fun and maybe learned a little something along the way. If you have any questions holler at me!
This tutorial is ©BamaVamp and was written on 3/20/06.
If you have any questions please feel free to holler at me.
DO NOT copy this tutorial, and do not translate it into other languages.
Contact me for usage information.
Any likeness to any other tutorial is coincidental.


No comments:
Post a Comment