
©BamaVamp
This tutorial was written using PSP 9, but should work with any version of PSP.
Supplies Needed:
Devilicious Scrap Kit (Freebie) From Kristin HERE
Plugins: Xenofex Constellation and Eyecandy4000
My 2 Gradient Glow Settings (included in zip)
Mask by Vix (included in my zip)
Animation Shop
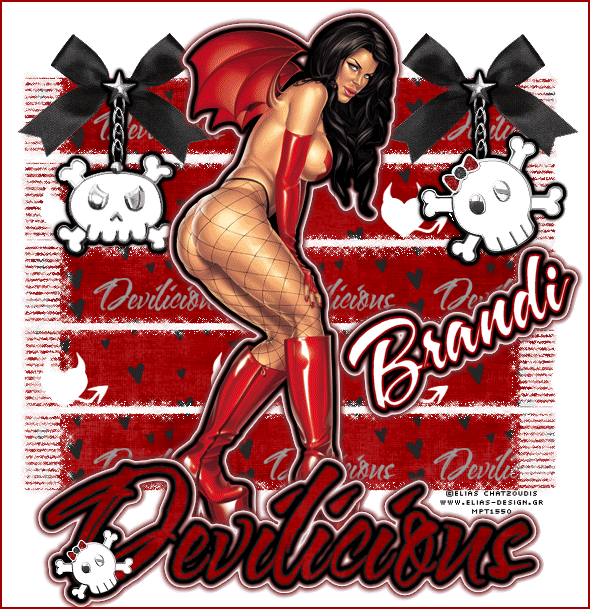
Tube of your choice. I am using the licensed artwork of Keith Garvey. You may purchase his art at mypsptubes.com
Download my supplies HERE
~~~~~~~~~~~~~~~~~~~~~~~~~~~~~~
You will need to export my gradient glow setting to your eyecandy 4000 gradient glow folder. Open your plugins folder on your C drive, find the Eye Candy 4000, double click on Eye Candy 4000 Settings, then double click on gradient glow. Copy n paste my black glow and devilishglow into that folder. If you have already started PSP you may have to close & restart it so that EyeCandy can find the new glow settings.
Get your other supplies open in PSP.
Start with a new canvas 600x600 in size and floodfill it with white.
Open paper6 from the Devilicious kit. Copy n paste the paper as a new layer on your working canvas.
Go to Layers...new mask layer from image. Load the Vix_Mask34 with Source Luminance checked. Merge your mask group. We are gonna go ahead and get the animation on the canvas out of the way before we start putting things on top of it. Select the bottom mask layer and go to Selections-Select All, Selections-Float, Selections-Defloat. Selections-Modify-Contract by 2. Selections-Invert. Duplicate your selected layer layer 3 times.
While on the bottom layer, go to Effects....Xenofex 2 Constellation with the following settings and apply: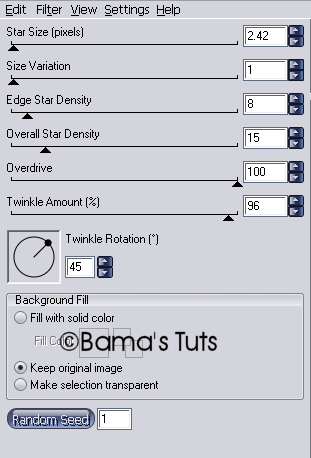
Use the same constellation effect on your other 2 layers, but be sure to click on the Random Seed button at least one time before you apply the setting.
Now we can go to Selections-Select None.
Copy n paste your tube as a new layer on your canvas. Go to effects, eyecandy4000 and apply the Black Glow by Bama. Go to eyecandy4000 again but this time apply the devilishglow.
From here its really up to you on your decor. I used the Bow1 from the scrap kit, pasted and resized it to be on each side of my tube. I then took the Skull chain, resized and put it on top of one of the ribbons. Then re-pasted the Skull Chain on the other side, but I erased the skull and replaced it with the skull charm2. I added the BlackGlow to both the chain charms.
I pasted the Devilicious word art and applied by BlackGlow, then applied the DevilishGlow as well. I made sure my tube was on top of everything except for the word art. From here I went ahead and added my Copyright information as well as my name. For my name I used a white inner color, red outer with a line width of 2 using the font A&S Snapper. I then added the blackglow and the devlishglow.
Now we are ready to merge and animate.
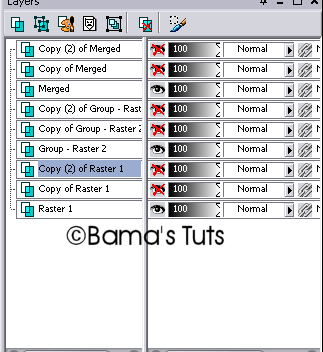
Hide the masked group layers for a moment as well as the bottom background layer. Merge Visible all the top layers and duplicate the merged layer 3 times. Unhide your background layer and duplicate it 3 times as well. You should have a total of 9 layers. Now close off all the layers except for the bottom of each duplicate. It should look something like this:
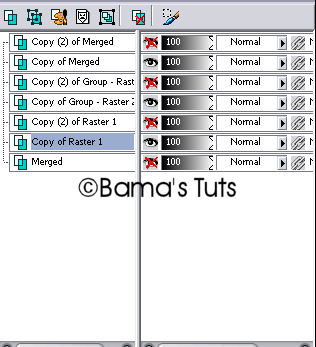
Merge Visible those layers and then hide that merged layer. Now we wanna unhide the bottom layers of the duplicates again, so it looks something like this:
Hide that layer and you should be left with 3 other layers. Merge those 3 visible as well. You should have only 3 layers at this point. Crop if you need to. Now save your image as a PSP file and open it in Animation Shop.
I opened my image in AS and just used the default settings and saved as a gif.
This tutorial is ©BamaVamp and was written on 3/20/09.
If you have any questions please feel free to holler at me.
DO NOT copy nor translate this tutorial.
Contact me for usage information.


No comments:
Post a Comment