
©BamaVamp
This tutorial was written using PSP 9, but should work with any version of PSP.
Supplies needed:
My witchy woman paper(included)
Eyecandy400 Gradient Glow(my setting included not the plugin)
Mura Meister Clouds Plugin
Tag Template #7 by Kristin at Wicked Scrapz HERE
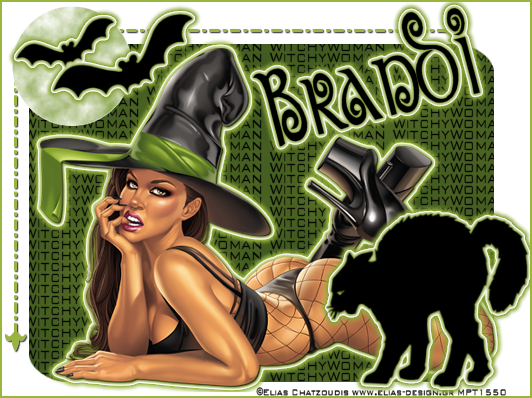
Tube of your choice, I am using the licensed artwork of Elias Chatzoudis. You may purchase his artwork at mypsptubes.com
Download my supplies HERE.
~~~~~~~~~~~~~~~~~~~~~~~~~~~~~~~~~~~
You will need to export my gradient glow setting to your eyecandy 400 gradient glow folder. Open your plugins folder on your C drive, find the Eye Candy 4000, double click on Eye Candy 4000 Settings, then double click on gradient glow. Copy n paste my wickedwitch glow into that folder. If you have already started PSP you may have to close & restart it so that EyeCandy can find the new glow setting.
Open the template and witchywoman paper in PSP. We wanna delete the copyright layer and I have chosen to delete the Pumpkin layer as well.
We are gonna start at the top and work our way down. Click on the Bats layer so that it is active, go to Selections...Select All...Selections Float...Selections Defloat. Now add a new raster layer on top of the bat layer and floodfill with black. Selections..Select None. We are gonna add our Gradient Glow. Go to Plugins..Eyecandy 4000..Gradient Glow. Under Settings you should see witchyglowbybama probably at the bottom of your list. Select it and then click Ok. You can delete the original Bats layer.
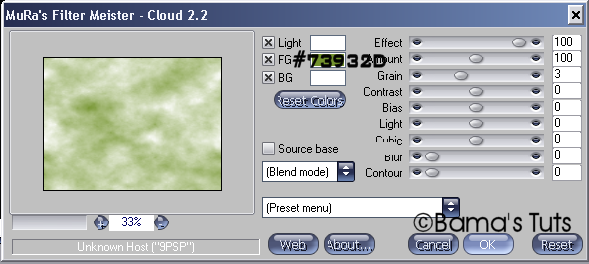
Click on the Moon layer in your palette. Go to Selections...Select All...Selections Float...Selections Defloat. Now to to Effects..Plugins.. Mura Meister..Cloud. Use the settings I have below:
Selections...Select None. We are gonna add a drop shadow of H1 V1 Opacity87 Blur2.00 and black.
We are gonna do the exact same thing for the cat as we did with the bats. Highlight the Cat layer in your layer palette go to Selections...Select All...Selections Float...Selections Defloat. Now add a new raster layer on top of it and floodfill it with black as well. Selections..Select None. We are gonna add our Gradient Glow. Go to Plugins..Eyecandy 4000..Gradient Glow and apply my witchy glow setting as before. You can now delete the original Cat layer.
Click on the Line Layer. Go to Selections..Select All.. Selections Float..Selections Defloat. Add a new raster layer, use your paintbrush tool on the normal round setting with a size of 50 and fill all of the lines running in both directions. Do not worry if you paint outside the lines--it will not show up. Go to selections..select none. Add the same drop shadow as before of H1 V1 Opacity87 Blur2.00 and black.
Highlight the Rectangle layer in your layer palette. Go to Selections...Select All..Selections Float...Selections Defloat. Copy my witchywoman paper and paste it as a new layer on your canvas. Go to Selections..Invert and hit the Delete key on your keyboard. Selections..Select None. You can delete the original rectangle layer.
Copy n paste your tube as a new layer. I placed my witch just under the cat but above everything else. Apply the same Eyecandy4000 Witchywoman Gradient Glow as we did before.
Add your copyright information as well as your name. For my name I used a font called Morgrow in black and applied my gradient glow setting. Merge Visible.
I also added a border to my tag. After merging visible I added a new raster layer, went to Selections..Select All..Selections Modify-Contract by 2 pixels. Selections..Invert and then floodfill with the color of your choice. Then Select None.
Merge visible and save.
This tutorial is ©BamaVamp and was written on 3/10/09.
If you have any questions please feel free to holler at me.
DO NOT copy nor translate this tutorial.
Contact me for usage information.


No comments:
Post a Comment